About Greylisting
Important: Greylisting is recommended for advanced users only. Make sure to read though this article thoroughly so that you don't accidentally get extended delays in legitimate email after enabling greylisting.
Greylisting is a method of defending against spam. Greylisting will tell the mail server to temporarily reject any email from a sender it does not recognize. If the mail is legitimate, the originating server will try again after a delay, and if sufficient time has elapsed, the email will be accepted.
- Warden uses Plesk's built in greylisting tool. Server-wide and domain level greylisting management is supported by Warden. Personal level (mailbox level) grey listing management is not supported and should not be enabled.
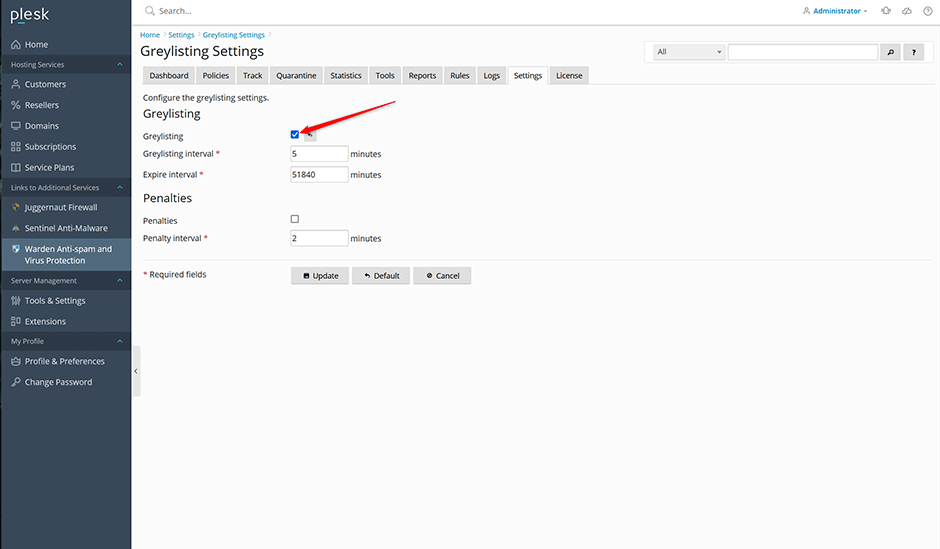
- Server-wide greylisting can be enabled/disabled in Warden ->Settings -> Greylisting Settings -> Greylisting . Unchecking and disabling the server wide setting will disable all greylisting and hide the greylisting tab in Warden for all domains.
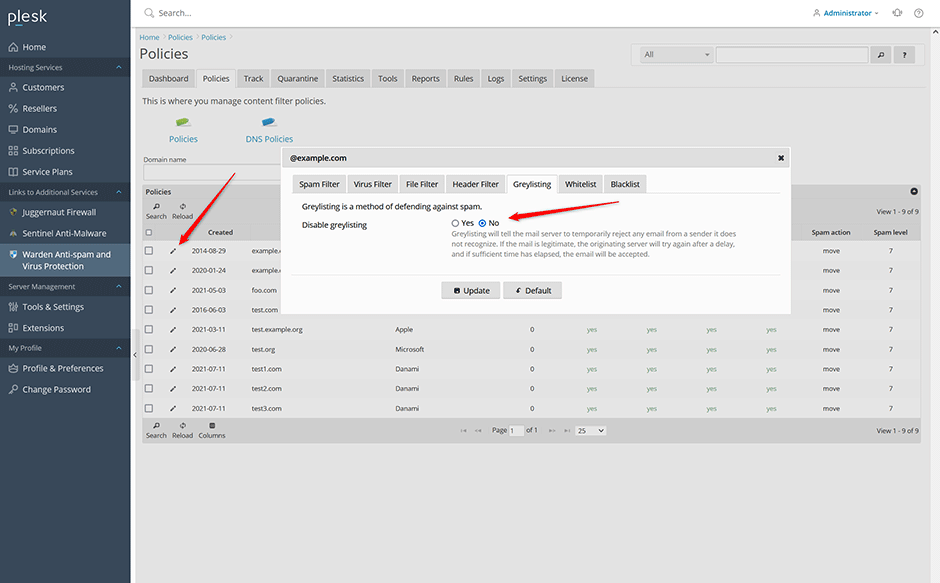
- Domain level greylisting can be enabled/disabled under Warden -> Policies -> click the edit icon next to the domain on the grid -> Greylisting -> Disable greylisting option (yes or no).
- Greylisting defers emails from senders that use multiple IP addresses so it is important to whitelist those providers otherwise you will get extended delays in email. Look at the "Senders that use multiple IP addresses" section below for how to whitelist those mail servers.
- Greylisting will be applied to any non-authenticated email (both incoming and outgoing email).
- There will be longer delays in email delivery after first enabling greylisting as it might take a few days for entries to be populated in the greylisting database.
Enabling Greylisting
To enable greylisting server wide go to Warden -> Settings -> Greylisting Settings -> Check the greylisting option to enable it. Note that unchecking and disabling the server wide setting will disable all greylisting and hide the greylisting tab in Warden for all domains.

After greylising is enabled server wide you have the option of disabling greylisting per domain under Warden -> Policies -> click the edit icon next to the domain on the grid -> Greylisting -> Disable greylisting (yes or no).

Viewing Greylisted Emails
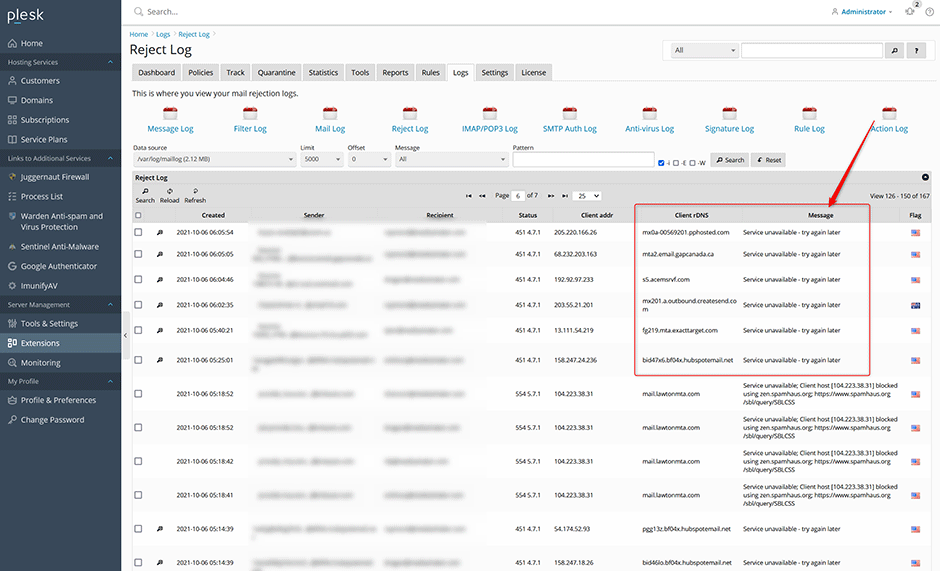
Emails that are greylisted will be listed under Warden -> Logs -> Reject Log. Greylisted entries will have the a 451 4.7.1 status with the message Service unavailable - try again later (postfix is telling the other mail server to try again later). You can use the message select list on the reject page to filter by Service unavailable - try again later to view all greylisted entries. Normally greylisted emails will have at least 3 rejected entries before delivery is accepted. The Client rDNS column in the reject log is important as that is what you will use to whitelist a mail server from greylisting. If you see many entries for the same message coming from different IP addresses then you might need to create a wildcard whitelist for that provider. See: "Sender mail servers that use multiple IP addresses" below for more information.

Sender mail servers that use multiple IP addresses
After enabling greylisting it is important to review your Warden -> Logs -> Reject log over the next week in order to whitelist those mail service providers that send using multiple IP addresses otherwise you will get extended delays in email. It could take 1 or 2 days for delivery with greylisting enabled unless you whitelist those mail servers. You can whitelist the mail servers using a matching wildcard on the Client rDNS (PTR record) of the connecting mail server.
Example: You might see the same email in the reject log coming from different mail servers from one provider:
a15-177.smtp-out.amazonses.com
a14-30.smtp-out.amazonses.com
a15-229.smtp-out.amazonses.com
e252-50.smtp-out.amazonses.com
To whitelist emails from Amazon matching all of the mail servers you can whitelist it using a wildcard entry (Remember that you are whitelisting the client RDNS record of the email server not an email address):
plesk bin grey_listing --update-server -domains-whitelist add:"*.amazonses.com"Known providers that send out using multiple IP addresses:
// Adobe
plesk bin grey_listing --update-server -domains-whitelist add:"*.adobe.com"

// Amazon
plesk bin grey_listing --update-server -domains-whitelist add:"*.amazonses.com"

// Ebay
plesk bin grey_listing --update-server -domains-whitelist add:"*.ebay.com"

// Google
plesk bin grey_listing --update-server -domains-whitelist add:"*.google.com"

// Github
plesk bin grey_listing --update-server -domains-whitelist add:"*.github.com"

// Linkedin
plesk bin grey_listing --update-server -domains-whitelist add:"*.linkedin.com"

// Paypal
plesk bin grey_listing --update-server -domains-whitelist add:"*.paypal.com"

// Shopify
plesk bin grey_listing --update-server -domains-whitelist add:"*.shopify.com"

// Telus
plesk bin grey_listing --update-server -domains-whitelist add:"*.telus.com"
Configuring Greylisting
Parameters like expire-interval, grey-interval, penalty-interval, and others can be configured under Warden -> Settings -> Greylisting Settings or using the Plesk CLI utility "grey_listing". Note: The personal command line option --update-mailname is not supported as it's tied to Plesk's legacy spam filter.
To view the current greylisting settings:
plesk bin grey_listing --info-serverTo enable greylisting for a specific domain:
plesk bin grey_listing --update-domain example.com -status onTo disable greylisting for a specific domain:
plesk bin grey_listing --update-domain example.com -status offWhitelisting
To whitelist a mail server from greylisting (Remember that you are whitelisting the client RDNS record of the email server not an email address):
plesk bin grey_listing --update-server -domains-whitelist add:"mail.example.com"To remove a whitelisted mail server from greylisting:
plesk bin grey_listing --update-server -domains-whitelist del:"mail.example.com"Blacklisting
By default greylisting will block any client rDNS that matches the following patterns (The default patterns match dynamic hosts that should not be sending any emails). Mail servers that are blacklisted will be listed under Warden -> Logs -> Reject Log. Blacklisted entries will have the a 451 4.7.1 status with the message Command rejected.
 *[0-9][0-9]-[0-9][0-9]-[0-9][0-9]*
 *[0-9][0-9].[0-9][0-9].[0-9][0-9]*
 *[0-9][0-9][0-9]-[0-9][0-9][0-9]-[0-9][0-9][0-9]*
 *[0-9][0-9][0-9].[0-9][0-9][0-9].[0-9[0-9]][0-9]*
 dsl|broadband|hsd
 dynamic|static|ppp|dyn-ip|dial-up
To add blacklist patterns:
plesk bin grey_listing --update-server -domains-blacklist add:"mail.badserver.com"To remove blacklist patterns:
plesk bin grey_listing --update-server -domains-blacklist del:"mail.badserver.com"Adjusting the Default Blacklist Patterns
Some of the default blacklist patterns will likely block email from legitimate providers so it is recommended that you remove them:
// matches mta-70-12-15.sparkpostmail.com
plesk bin grey_listing --update-server -domains-blacklist del:"*[0-9][0-9]-[0-9][0-9]-[0-9][0-9]*"

// matches outbound-147-160-155-33.pinterestmail.com
plesk bin grey_listing --update-server -domains-blacklist del:"*[0-9][0-9][0-9]-[0-9][0-9][0-9]-[0-9][0-9][0-9]*"

// matches mail25.static.mailgun.info so we remove the "static" pattern then re-add the rest
plesk bin grey_listing --update-server -domains-blacklist del:"dynamic|static|ppp|dyn-ip|dial-up"
plesk bin grey_listing --update-server -domains-blacklist add:"dynamic|ppp|dyn-ip|dial-up"
Disabling Greylisting For Newly Created Domains
Some users may want to have greylisting enabled server wide but have greylisting disabled by default for newly created domains. This can be done using a Plesk event handler. In Plesk go to Tools & Settings -> Event Manager -> Add Event Handler:
Event: Default domain (the first domain added to a subscription) created
Priorty: lowest(0)
User: root
Command: /usr/local/psa/bin/grey_listing --update-domain <NEW_DOMAIN_NAME> -status off

